Do you want a fun DIY treat for St. Patrick’s Day that is affordable AND easy to make?!
It’s no secret that my kids are picky eaters (I mention it many times)! But one of the foods that they both like is pretzels! So for a fun St. Patrick’s Day treat, I decided to dip them in chocolate, but not stop there. Why?! Because when you put three pretzels together, you get a shamrock shape!!! YES, for reals! I know…I was delighted too!!!
So because it’s your lucky day, I’m going to show you exactly how to make these chocolate-covered shamrock pretzels, and a super cute way to display them!
To start, you’ll need:
-
- Pretzels…I grabbed a bag from Aldi, and I like the shape of their pretzel brand more than the Rold Gold ones, but I’m sure any will work just fine!
-
- Green melting chocolates…I used Wilton, green and vibrant green
-
- Lollipop sticks…I used Wilton, and they’re the 4in size ones
-
- Rainbow sprinkles and gold sprinkles…I used Wilton
-
- Ziploc bag…to crush the Oreos in
-
- Oreos…just the chocolate cookie part (enjoy those cream centers, and don’t feel guilty about it one bit)!
-
- Gold coins…chocolate or plastic ones will do the trick
-
- Black terracotta pot…or whatever kind you can find (I found mine at Michael’s)
-
- Flower foam…I got a round two-pack from Michael’s
- Parchment paper, cookie sheet, vegetable oil, rolling pin

Step 1:
Heat up your melting chocolates. The trick here, is that more is more. I find that people typically struggle when dipping things in chocolate, because they don’t have enough chocolate melted to begin with! Put the whole bag of each color in a small bowl (or I used tupperware), and heat for 30 seconds in the microwave. Then stir, and repeat two more times. Usually, 1 1/2 minutes is the sweet spot (pun intended) for getting them fully melted, but not scalding and burning the chocolate. Do this for both colors, separately. I then got a third plastic container out, and mixed an equal amount of both greens to make a third, mid-range green color, simply because I love odd numbers 😉
{Pro tip: If your chocolate is fully melted, but still seems a little thick, add a bit of vegetable oil, and stir it in!}
Step 2:
Line your cookie sheet with parchment paper, and get ready to get started!
Step 3:
Check out the video below to see exactly how I made them from beginning to end…the video is less than 1 1/2 minutes!
After you have your shamrocks are done, put the tray in the fridge for faster cooling, but if you don’t have room, no worries! They’ll harden at room temp. If you have leftover chocolate, save it! That’s why I put mine in tupperware…a lid will keep it nice and sealed, and you can reheat it whenever you have another project!

Step 4:
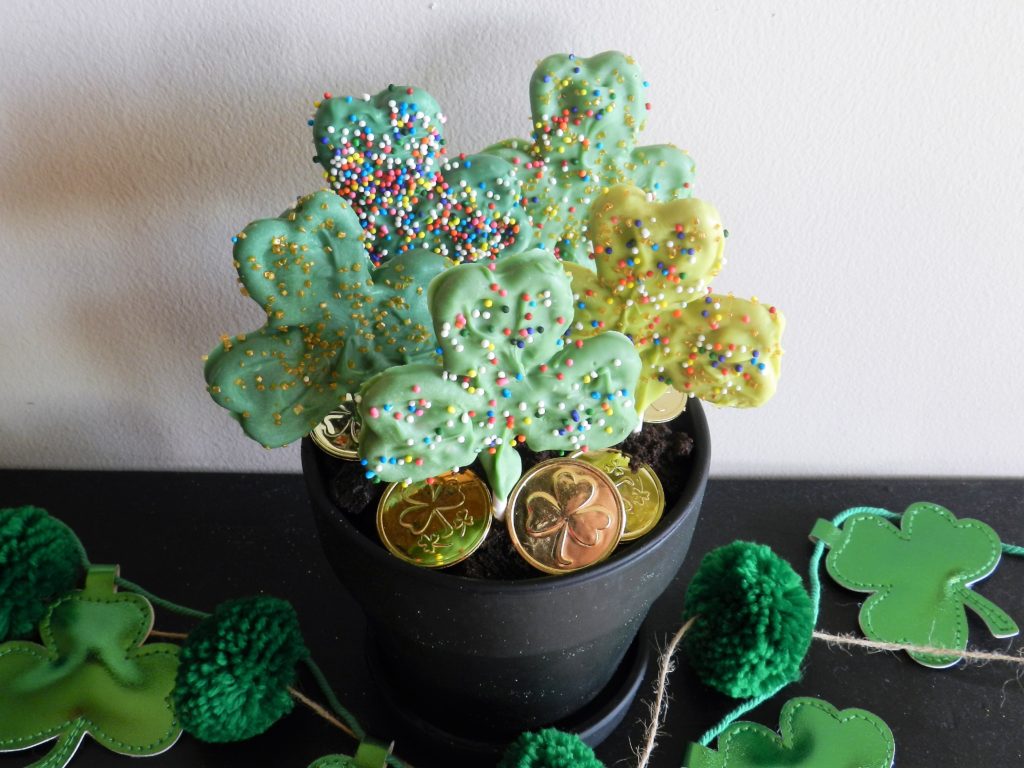
Take your floral foam and cut it to fit your terracotta pot! You may not have to trim it depending on the size of your pot. My initial thought was to display the shamrocks in a traditional terracotta pot, like the ones below (they come in every size) with the oreo “dirt” and call it a day!

But then I saw the black pots, and knew I had to make it a pot of gold shamrock “garden” of sorts, but they only came in the one size! Therefore, I had to cut down my foam a bit to fit in to the black pot. I did this outside because the foam can tend to get everywhere, and you can see I “peeled” it (much like you would an apple) with a knife.
{Pro tip: Don’t take off too much of the foam. You can always cut more away, but it’s hard to add it back on!}
The more narrow, but thicker piece went in first, and then the wider, but thinner piece, went on top of that , to fit the shape of the pot nice and snug! The foam doesn’t have to go all the way to the bottom, as long as it’s tightly in there!

Step 5:
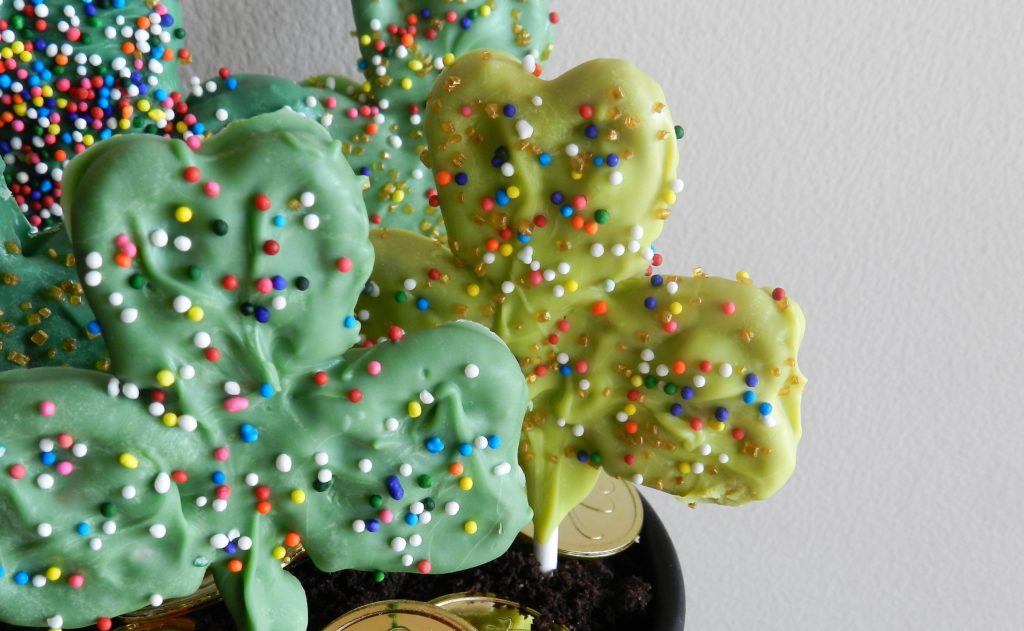
Start placing the shamrocks in the foam! I used five, again because I like odd numbers, but you can add as many as will fit in your size pot! Think of the points of on upside-down star…that’s where I placed mine in the foam.
Step 6:
Put the chocolate cookie parts of an Oreo in a ziploc bag and crush them up with a rolling pin, or whatever you have that will work! Spread the cookie crumbles all over the foam so you can’t see it anymore, and garnish with the gold coins! The chocolate ones were a bit big for this project, so the plastic ones worked better for me, but certainly either will do!

![]()
The great thing about chocolate covered pretzels, is that they last a long time and don’t need refrigeration! So you can use this as decor, but also as a special treat!!! If you’re having a party, and need take home gifts, use the small/individual terracotta pots, and put one shamrock in each! If you’re hosting a party, and need name tags/place settings, use the small terracotta pots, paint them with black chalkboard paint, and then write the guest’s name on it with chalk!
Now’s the time where I torture my minis by asking for a photo shoot 😉 They’re actually quite good sports, but I must’ve said, “is that your real smile?” ten times!


If you happen to make these, or some version, please tag me @mirandainclt, or use the #mirandainclt hashtag! I love to see your projects so so so much!
And please PIN IT!!!

HAPPY ST. PATRICK’S DAY!!!


Irish & Love it ! Who-ever thought cookies could be so beautiful. Thanks for sharing 😀
Thank you so much! I’ll be on Charlotte Today making them live if you’re local…NBC 11am! xo
The shamrock lolly’s were so cute and delicious…sweet and salty!!
agreed!!! i love the salty and sweet! glad you made them 🙂 xo
Adorable and yummy!!
so much so! xo
Such a cute idea!
thank you friend!
Cute clovers! Great idea!!
thank you!!!